 |

|
 |


Begin OCR Text:
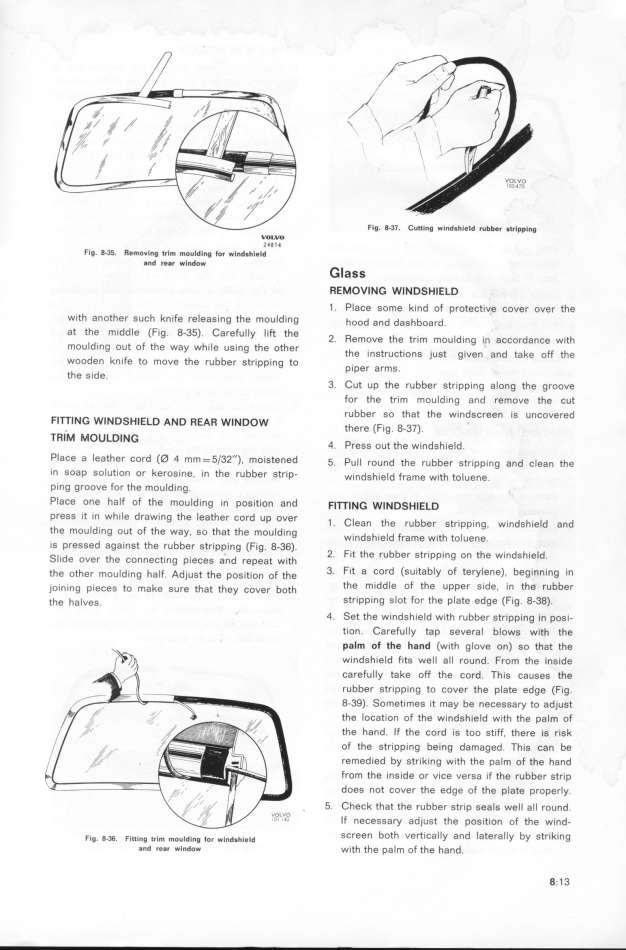
vo_vo Fig. P37. CutIlng _lnd$hieid rubber g_,ipp,_g
2l__ l
Flg_ 8_35_ Removing trlm mouiding _or windg_iejd
and re8r wlndo_ Glass
REMOVING Wl ND_HIELD
h 1 _ PlaCe some kind of protective cover over the
W_t an Other SuCh knife releagi,g the mou_di,g hood a,d daghboa,d
at the middle (fig. 8-35). Carefully _j_ the _ _ h '
_d . F h h _ emOVe t e trlm m Ou Id ing i_ accordance with
mOu i,g OUt O t e Way W I _e U Sl,g the other h . _
d k .F h t e l nStrU Ctl OnS )U St gIVen and take off the
WOO en n l e tO mOUe t g rUbber gt,ippi,g to
h plper armg
t e S Ide. _
3_ Cut up the rubber stripping along the groove
for the trim mouldi'ng and remove the šut
F___N_ w_ N D_ H_E_D AN D ffEAff w_NDow rubber so that the windscreen ig u,šovered
. there (fig 8-37)
TRIM _OULDlN_ ' '
4. PreSS out the wi,dghie_d.
Place a leather cord (ě 4 mm = 5/32''), mo_gtened _. p,__ ,,,,d th, ,,bb,, ,t,.,pp.,,g ,,d ,_,,, th,
ln Soap Solution or kerosine. i, the ,ubbe, gt,ip- w__ndgh.ie_d F,ame w.ith to_uene
Ping gfoove for the mouldi,g. _
PlaCe one half of the mou Iding in pogitio, a,d F___N_ w_ ND_H_ELD
preSS it in whi Ie drawing the _eathe, šo,d up ove, _ C_ h
th _d . F h _ ean t e rUbbef Stfipping. windShield a,d
e mOU In▀ OUt O t e Way, So that the mou_di,g d h
. d Wl, S Ield Frame with tolue,e
iS PreSSe aga_nSt the rUbber stripping (Fig. g-36). '
S_j_de ove, the šo,,e,t__,g pj_e,eg a_,d ,epeat w.ith 2_ fit the rubber stri'pping on the windghield.
the other mould _ng ha_F. Ad)ugt the pog__t_,,, ,F th, 3_ fit a cord (suitably of terylene), beginn ing in
j'oining pieces to make gu,e that they šove, both the m iddle of the upper side. in the rubber
the ha Ives. Str_ P P_ng slot for the plate edge (fig. 8-38).
4. Set the windsh ield with rubbe, gt,ipping j, pogi-
tion. Carefu Ily tap several blowg with the
Palnl of the hand (with g Ioue on) so that the
windshield fits well a Il round. F,om the i,gide
Carefully take off the cord. Th iS caugeg the
rubbef stripping to couer the p Iate edge (fig.
8-39). Sometimes it may be necegga,y to adjugt
the location of the windshield with the pa_m of
the hand. If the cord is too stiff, the,e i6 ,igk
of the stripping being damaged. Th ig ša, be
remedied by striking with the pa Im of the hand
ffOm the inside or vice versa if the rubbe, gt,ip
doeS not couer the edge of the plate proper_y.
. 5_ Check that the rubber strip seals we_ _ al_ ,ou,d.
If neCessary adjust the position of the wind-
Fig. g.36. F_((__g _,i_ mo,_d_,ng _o, wind,__,,id SCreen both uerti'cal Iy and lateral Iy by gt,iki,g
8nd ,e8r WIndow with the pa_m of the ha,d. 8. 1 3
|

