 |

|
 |


Begin OCR Text:
1 2 3 _ 5 6 _ _
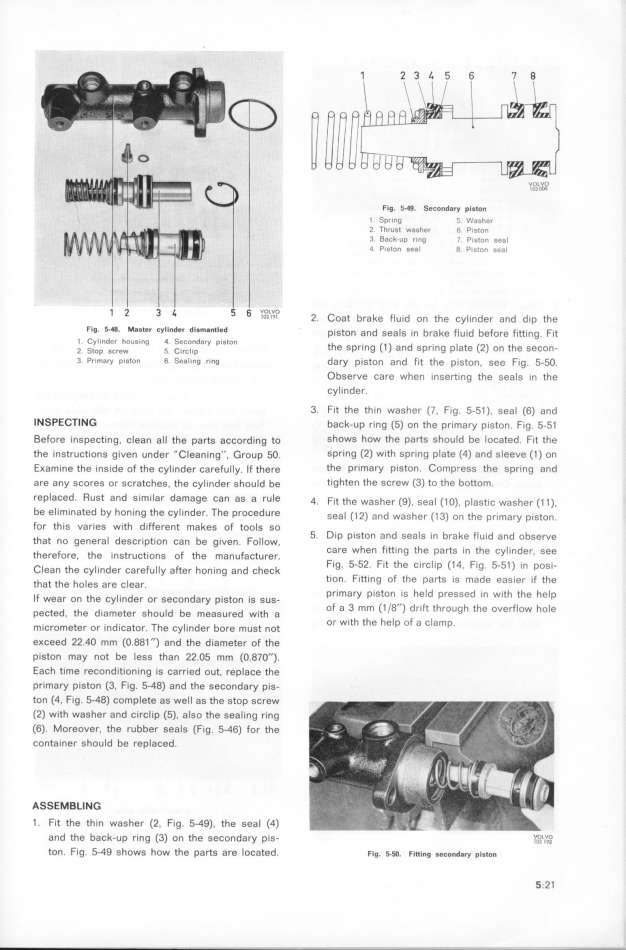
Fi$. f_49. Secondary piston
l Spring __ Washer
2 Thrust washer 6 Fig_o_
3. Back_up ring 7 PistDn geal
O Piston Seal 8 Pi,ton gea_
1 2 3 _ 5 6 _oLVo 2 C b
IO,I9I . Oat rake F_Uld On the CyjInder and dIF the
Fig_ f__ Ma9ter tylinder disnI8ntled p_gton and gea_g __n _,ake __u___ _eFo,e ___tt__ng F_t
l Cylinder housing 4 Secondary piston th . (_) d
U . '_ U (
U2) h
l '
_ __op ,e,,w _. _,,e_,_p e SpfIng an SFr_ng F ate On t e SeCOn-
3 PrimaY piston 6 Sealing ring da,y piston and f_t the pigton, gee Fig. 5-5O.
ObServe Care when inSeft_ng the SeaIS in the
cylinder.
3. Fit the thin washer (7, fig. 5-51), seal (6) and
INSPECTING back-up ring (5) on the primary piston. F_g. 5-51
Before inspecting. clean all the parts according to ShowS how the parts should be Iocafed. Fit the
the instruct_ons given under _Cleaning''. _,oup 5O. spring (2) with spring plafe (4) and sleeue (1) on
EKamine the inside of the cylinder carefully. _f there the pr_mary piston. Compress the spring and
are any scores or scratches, the cylinde, ghou_d be tighten the screw (3) to the bottom.
feFlaCed. Rust and s_milar damage can as a rule q. F_,t the waghe, (g), gea_ (_o). p_agt_,ç waghe, (__),
be eliminated by honing the cyl_nder. The procedure __ea_ (_2) and w'ag'he, (_3') o'n the p,__ma,y p,g'ton'
for this varies with different makeg of too_g go ' ' ' ' _
th t _ d b F __ 5. Dip piston and seals in brake fluid and obge,ve
a nO genera eSCrlptlOn Can e gIVen. o oW.
th F th . . F h F Care when fitting the parts in the cylinder see
ere Ore, e InStrUCtlOnS O t e manU aCtUrer. '
C_ean the çy_._nde, ça,eFu__y a Fte, hon._ng and çheçk Fig. 5-52. Fit the circlip (14. Fig. 5-51) in posi-
that the ho_eg a,e ç_ea, tion. fitt_ng of fhe parts is made easier if the
_F th _. d ' d F,imary piston is held pressed in w_th the help
Wear On e Cy In er Of SeCOn ary pIStOn IS SUS-
peçted the d,amete, ghou_d be meagu,ed w._th a of a 3 mm (t/8'') dr_ft through the overflow hole
. ' d Th _ d b or with the help of a clamp
mICrOmeter Or In ICatOf. e Cy In ef Ore mUSf not '
eKceed 22.4O mm (O.081'') and the diamete, of the
piston may not be less than 22.O5 mm (O.07O'').
EaCh time reConditioning iS Carried oUt. ,eplaCe the
Frimary piston (3, Fig. 5-48) and the seCondary pis-
ton (4, fig. 5-48) complete as weIl as the stop screw
(2) wifh washer and circlip (5). aIso the sealing ring
(6). Moreover. the rubber seals (Fig. 5-46) for the
container should be replaced.
ASSEMBLING
1. Fit the thin washer (2. fig. 5-49), the seal (Q)
and the back_up ring (3) on the secondary pis_ V,,O,L,v,o,
tOn. Fig. 5-49 Shows how the parts are located. Fig. _-_. Fitting seconday p_gton f_.21
|

