 |

|
 |


Begin OCR Text:
v_oo3__v_o_
v_o__v_o
_2
3
- , __ _ _pdp__--_,
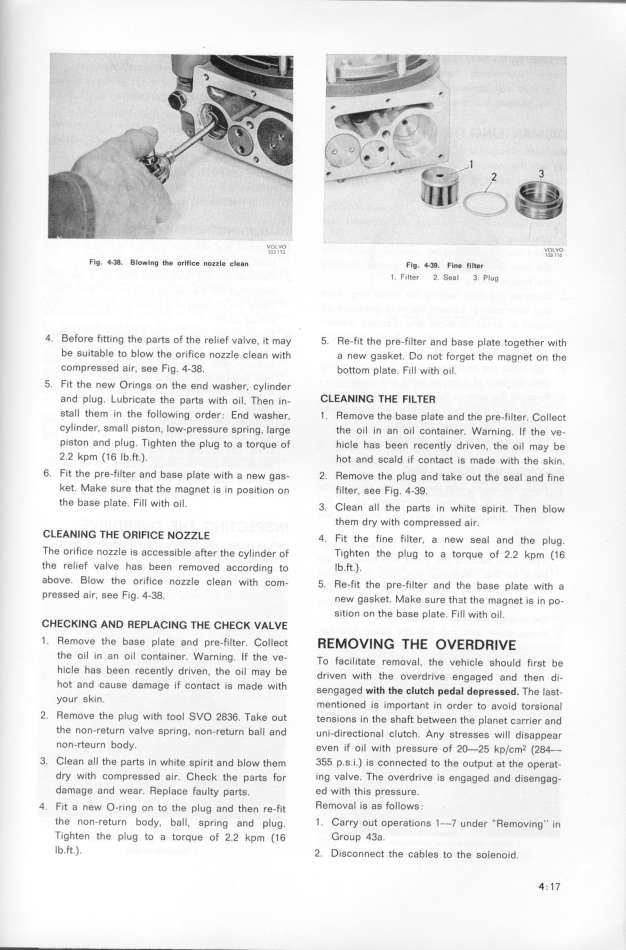
Flg. _38. Blowing the Drl_l_e nozzlg _leen Fig. 4_0. Fine flller U3
6
1 F1lter 2 Seal 3 Plug_
4. Before fitting the parts of the relief valve. it may f. Re-fit the pre-filter and base plate together with
be Suitable to bloW the orifiCe nozzle Clean wjth a new g3Sket. _o not forget the magnet on fhe
CompreSSed aif, See Fig. 4-38. bottom plate. FiIl With oil.
5. Fit the new OringS on the end wagher, Cylinder
and plug. _ubrjšate the pa_e with oi_. Then in- CLEANING THE FILTER
Stall them in the following order. End wagher, 1 . RemoVe the baSe plate and the pre-fIltef. CoIleCt
Cylindef, Small piSton, low-pfeSSure gpring. lafge the oil in an oil Containef. Warning. If the ve-
piSton and plug. Tighten the plug to a torque of hicle has been recently driven. the oil may be
2.2 kpm (1 6 Ib.ft.). hot and SCald iF ContaCt iS made With the Skin.
6. fit the pre-filtef and bage pIate with a new gas- 2. RemoVe the pIUg and take oUt the Seal and fine
ket. Make sure that the magnet ie in poSition on fiIter, see Fig. 4-39.
the baSe plate F_ll With o_l 3 Clean a_l EURhe pa_s _n whiEURe gDirjEUR The b_ow_ _ . l _ . n
them dry with compressed air.
CLEANIWG THE ORIFICE NOZlLE 4 Fit the fine fi_ter a new gea_ and the p_ug. , .
The orjfiše nozz_e ig ašCesgible afier EURhe Cy_inder of Ti▀hten the plug tO a tOfqUe Of 2.2 kpm (1 6
the relief VaJve haS been removed aššording EURo Ib.ff.).
abOVe_ BlOW the Or_f_Ce nOZlle Clean Wlfh COm- 5. Re-fit the pre-filter and the base plate with a
pfeSSed a_r See F_g 4-38 new gagket Make eure EURhaEUR the magneEUR ig jn po. _ _ . -
Sition on the baSe plate. Fill With oiI.
CHECKING AND REPLAC_NG THE CHECK VALVE
1 . Remove the base plate and pre-filter. Collect _E_OV___ _HE OVE_D__VE
the Oil ln an OIl COntaingf Warning If the Ve- T F ___EUR t _ EURk h_ _ h __ F_ EUR b
_ _ o aCi i a e remova , _e Ve iC e g ou u ,jrS e
hlCle haS been reCently drIVen the O_l may be d _ _EURh EURk _ _ _ _ EURk __
_ riven wi _e overurive engageu anu _en ui-
hOt and CaUSe damage _f COntaCt lS made Wlth g d _th t_ l EUR h d l _ d Th l EUR
engage wi _e c u c pe a _epreG6e . e as =
yOUr Skln EUR_ _ _ _ EUR + _ _ + __ EUR _ j
_ men ioneu iS impor an, in oruer _o avoiu orSiona.
2 RemoVe the pIUg With tool SVO 2836 Take oUt EURengjong in the gha_ beEURween the planeEUR š3rrier and_ _
the non_fetufn vaIVe spring. non-retufn ball and uni-directional clutch. Any stresseS will disappear
non rEUReurn body even if oi_ wiEURh preSeure of 2_25 kp/šm2 (204= _ -
3. Clean a_l the pa_s jn whjEURe gpirjEUR and b_ow EURhem 355 p.S._.) lS COnneCted tO the OUtput at the Operat-
dy wjEURh šompreeged air. Chešk the p3_g for Ing VaIVe. The OVefdrIVe _S engaged and dISengag-
damage and wear. Replaše faulty parEURs. ed With thlS pfeSSUre.
4 __EUR _ _ EUR EUR_ _ _ EUR_ __EUR RemOVal IS aS FOl_OWS _
. . l a neW u-flng On O _e p,Ug anu _en fe=,l _
EURhe non_return body. ball, gprjng and plug. 1 . Cary OUt OpefatiOnS 1_7 Under '' RemOVjng'' in
Tighten EURhe plug to a torque of 2.2 kpm (_ 6 GrOUp 43a.
lb.Ft.). 2. DiSšonnešt the Cableg to the Solenoid. 4 __ 1 7
|

