 |

|
 |


Begin OCR Text:
P 1 2O, P 1 8OO _
__ 1_ _ voLvo
l7l6__ vo_vo _
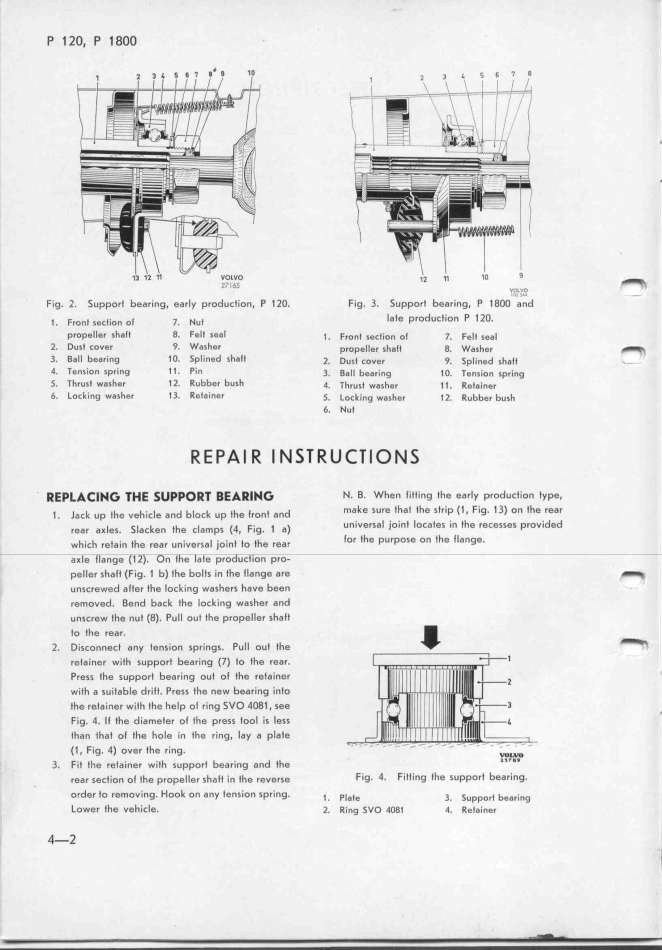
F-ig_ l_ Support bearing, early production, P 12O. Fig. 3. Support _bearing, p _goo' 'â,''d -
_. F,o,i geCtio, oi _. _,t late product_ion P 1lO.
propeller shalt B. Fe_i geal _. Fro,t geCi_io, ot _. Feit geai
___ DUSt CoVer 9. Wagher p,opeiie, gfa_j g. wggfe, _
3_ Ball bearing 1O. 5pli,ed gh8Jt _. Dugi Cover q. 5p__,,ed gfatt '
i O. Tengion gpri,g 1t. Pi, 3. gaii bea,_,,g _o. _e,g.,D, gp,._,g _
5_ ThrugI wagher 12. Rubber bugf 4. _f,ugt wagfer __. _eig__,e,
6_ Locking Wagher 13. Refai,e, _. _oC__i,g wagfe, __. Rubber bugf
6. Nut
R E PA l R l N _7 R U __ l O N _
_EP___I__ _HE _UPPO__ _E_____ N, B, When titting the early production type,
_. _,,k up jh, ,eh_,,ie ,,d b_o,k ,p jh, _,o,t ,,d n_ake sure tfat the strip (1, Fig. 13) on the rear
,e,, ,,ie,. S_,,_e, ihe ,_,mp, (4. F_,g. _ ,) universal joint locates in the recesse, provided
wh_,,h ,ej,,_, jhe ,e,, ,,_,,e,,,_ )_o_,,j jo the ,e,, lor the purpose on the llange.
peller shaft (Fig. 1 b) the bolts in the flange are _
unscrewed alter the locking washers have been
removed. Bend back tfe locking washer and
unscrew the nut (8). Pull out tfe propelIer shalt
to the rear. _
2. Disconnect any tension springs. Pull out the _
retainer wifh support bearing (7) to the rear.
Pres, the support bearing out of the retainer
with a suitable drilt. Press tfe new bearing into
the retainer with the help of ring SVO 4O81. see
Fig. 4. Il the diamefer ol the press tool is less '
than that of the hole in the ring. Iay a plate
(f, Fig. 4) over the ring. _ _ _ _ _ _ _ _ w_
3, Fit the retainer wifh support bearing and fhe '''''
. rear section of the propeller shalt in fhe rever,e Fig_ 4_ Fitting tl_e suppoYt bearing_
order to removing. Hook on any lension spring. _. pi,te 3. 5,pp,,i be,,.,,g
Lower tfe vehicle. _. R,,g _vo 4og_ 4. _,j,_,,g,
4-2 ,
|

