 |

|
 |


Begin OCR Text:
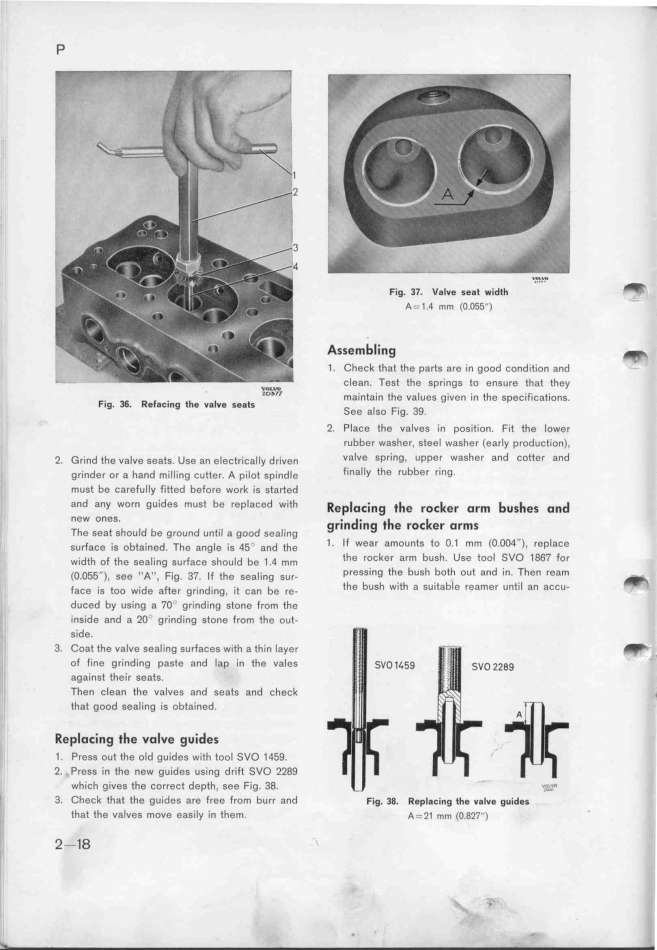
P Fig, 3_. v8Ive se8t wid__ __ _
A=1.4 mm (O.O55'') -
Assemb_ ling _
1_ Check that the parts are in good condition and
w_ Clean. Test the springs to ensure that they
F_,g 36 ff$_,,_,,g t_, ,,_,e ,e,t, 'O''' maintain the values given in the specifications.
' ' See also F_ig. 39.
2_ Place the valves in position. Fit tfe lower
rubber washer, steel washer (early production),
2. Grind the valve seats. u,e a, electrjša__y driven Valve spring_ upper washer and cotter and
grinder or a hand milling cutter. A pi_ot ,pind_e finally the rubber ring.
must be carefuIIy fitted before work is sta_ed
and any worn guides must be rep_aced with RepIo__ing i_e fo__ef ofm bushes ond
neW OneS. _ d_ i_ _
_he se,t ,fou_d be ground ,nt,__ a good sea_j.,g gfln Ing e fO_ ef OfmS
gurfacg is obtajned. The a,g_e i, 4_ _ and tfe 1_ If wear amounts to O.1 mm (O.OO4''), replace
widtf of tfe sea_ing su_ace gfould be _.4 mm the roCker arm bush. Use tool SVO 1g67 for
(o.o55''), gee ,,A,_, Fig. 37. _F the seal_i,g ,u,- pressing the bush both out and in. Then ream _
face is too wide after grj,di,g, jt can be ,e. the bUsh with a suitable reamer untjl an accu_
duced by using a 7O' grinding stone from the
inside and a 2O grinding stone from the out-
side.
3_ Coat the valve sealing surfaces with athjn layer
_
of fine grinding paste and lap in the vales __5g
o__gg '
against their seats.
Then clean the valves and seats and šheck ,
that good sealing is obtained.
RepIo_ing the voIve guides
1. Press out the old guides with tool SVO 145g.
2. . Press in the new guides using dri_ SVO 22gg
whÝch gives the correct depth, see Fjg. 3g. __,,_
! 3, Check that the guides are free from burr and F_,g. 3g. ffgp_,,_,,g t_e ,,_,e g,_,d,,
that the valves move easily in them. A___1 mm (o.g____)
_
' 2-18
|

