Reinforcing Volvo 1800 Crossmembers
Becoming Less Flexibleby Brooks Townes
For years I'd heard tales of woe about 1800 front cross-members cracking, shock-towers failing, and lower A-arms coming adrift where their big bolts emerge from the cross-member. "Don't use Koni or Bilstien shocks or you'll bust out the shock towers," many advised, so I went with KYB shocks, which I've liked. But I have driven the bejesus out of my `72 ES for way more than 20 years now and since I was giving the car its half-million mile servicing and had the engine out, I thought it time to really inspect the cross-member.
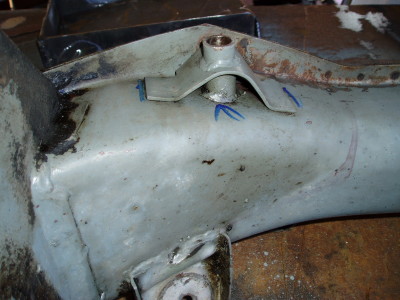
I wasn't expecting much damage since mine is a West Coast car never driven on salted roads, but close inspection brought concerns - and amazement at how funky some of the original welds were!
Look at this picture (click fer a closeup). It shows the back side of the cross-member, the pipe-sleeve through the member where the right side lower A-arm bolt emerges. At a glance, it looked ok. A little scrutiny showed it wasn't.
First, the welds all looked pretty damn rough and agricultural. The reinforcing "bridge" supporting the rather long pipe exposure was just spot-welded in a couple of places. The filet weld around the pipe itself at its junction with the cross-member proper was cracked, but that was hard to tell. A tiny trace of rust gave it away, and looking with a magnifying glass revealed the weld bead separated from the cross-member (blue arrow).
I got lucky in finding a really top-notch welder, a man certified to weld nuclear containment vessels, which trumps submarine welder. He's also been an aircraft welder, a fabricator of tall aluminum and stainless "tuna towers" for mega-yacht big-game fishing boats. The blue lines along the ends of the 'bridge' are marked to point out how he would run continuous beads. He ended up running continuous beads around most of each reinforcement on all four pipe exposures.
My shock towers were fine - I thought. Then I realized the holes had worn larger and been pounded up, a kind of mushrooming, by half a million miles of worth of shock jounce.
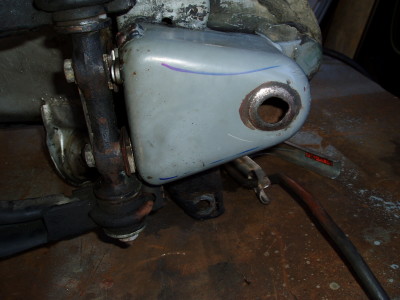
Clearly, my shock towers needed reinforcing if I was to continue driving my car con brio, which of course I will. The blue lines show where Bob-the-welder felt the perimeter of the 3/16"-thick reinforcing plate would fall. Most reinforced shock towers I've seen have just a dinky 2" by 3" plate welded across the hole and bored out to accept the shock end-post and gromets, often slapped on with farmer's welds. Lots of lumps and weld splatter and questionable penetration. I feel good about this job Bob did!
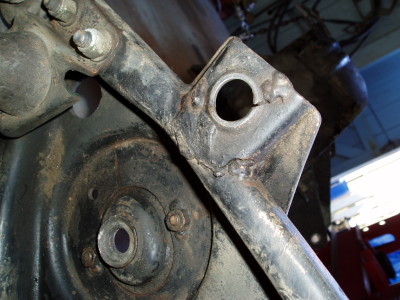
While inspecting front frame and suspension bits, it pays to look on the lower A-arms at the attachment tabs for the anti-sway bar links. Mine had clearly begun to split out before and somebody gave them a quick & dirty dab of welding. This was probably while I've owned the car and I likely knew about it but I'm growing old with my car and the memory, it is gone. Anyway, these truly third-world agricultural weld would no longer do. Bob couldn't stand looking at them, so he ground them off and welded on a very thick fender-washers giving the anti-swaybar links proper steel attachment points.
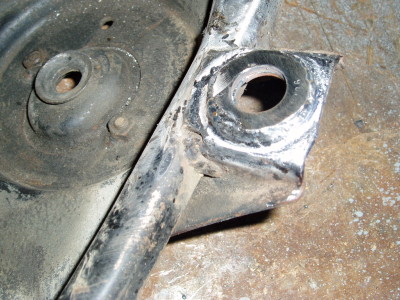
This is the anti-swaybar tab on a lower A-arm after Bob welded reinforcement on with a continuous bead all the way around. Before this was installed in the car, the A-arm got cleaned and prepped and primed and shot with tough pickup truck bed-liner, a thick black plastic-like finish that sealed overlapping metal from moisture and resists chipping from road grit.
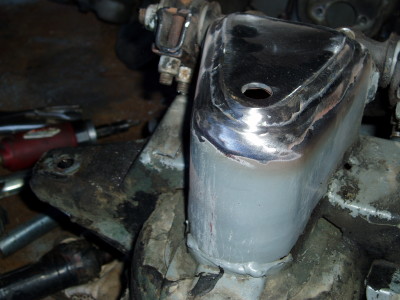
You can see the plate Bob welded to the shock tower. It almost covers the entire top of the tower and is now part of it with a continuous weld all the way around. The hole (5/8" as I recall) is what the original was before it did time in prison. You can see by the bare metal below the weld bead that Bob is very thorough in his prep work. No worries about penetration here. Also, with the plate covering the entire tower top, there's less liklihood of anything coming adrift under hard cornering.
When all the welding was done, I cleaned the entire cross-member, acid-preped all bare metal with ospho, shot it with a high quality primer and then a top quality grey paint to match the factory grey. The insides of the shock towers were liberally slathered with Z-spar Syncroprimer, a marine steel primer so good the EPA outlawed it but I managed to snag a quart first.
The underside of the cross-member where it runs under the engine got coated with primer and pickup truck bed-liner. Into all areas I was unable to get to and paint, I poured liberal quantities of high-stick chainsaw bar-oil. It takes years for that stuff to completely run off even vertical surfaces.
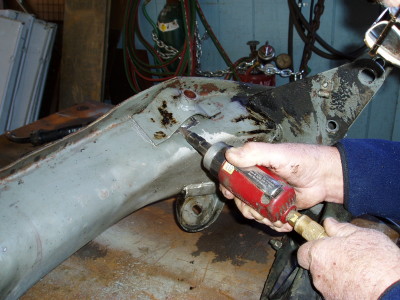
Here Bob is prepping one of the A-arm pipe weld areas with an air-grinder. He spent quite a bit of time preparing his welding surfaces - the secret to a good job. If your welder doesn't do the same, find another guy.
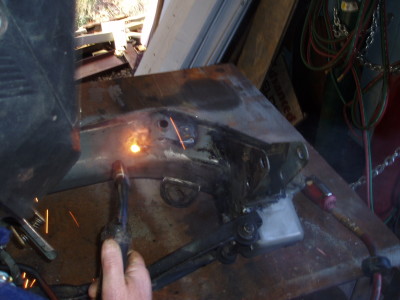
You'll go blind if you watch the rosebud but the camera doesn't. This is a blind shot of Bob pausing for the metal to cool while running beads continuously around an A-arm mounting pipe tab. Note the upper A-arms still attached. There was no need to remove them, thus the shims and front wheel camber was left unchanged while the cross-member was out of the car.
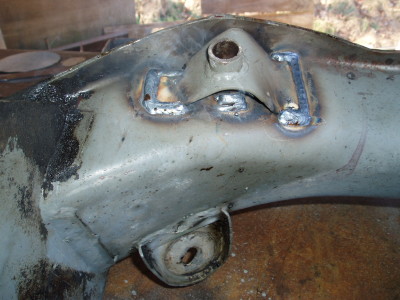
Here you can see the almost continuous and very even bead around an A-arm attachment pipe reinforcement. This is so much better than the quick & dirty spot welds the factory thought they could get away with. Maybe if the cars were sold only to doctors' wives, but it wasn't near good enough to stand up to hot-shoes 35 years later.
After all that pretty work, once the cross-member is reinstalled in the car, who'se going to see it?
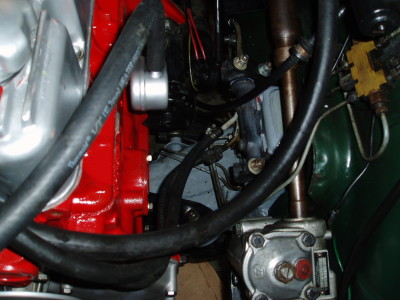
It really is amazing, the difference having Bob weld up the cross-member and A-arm tabs. The car was beginning to feel like an old machine before, and now it's so solid and far more controllable without the A-arms wiggling about on their own.
While we were at it, we installed all new urethane bushings (replacing in the upper A-arms Delrin bushings that had begun to hog out inside) and I had a reputable racing engine builder put together a new much-refined B20 for the car. Now that all that's done at the front end, I'm yanking the rear axle and having new bearings and a limited-slip installed. With all this work and over all those years and half a million miles, I've still spent less on my rust-free, never-bent ES in total than the price of a year-old Miata. Of course, I'm not counting my time & labor.
I do wish I'd done the cross-member repair/reinforcement years ago, though. It makes that big a difference!
Brooks Townes - 1/2007
| 
