|
Back to the Drawing BoardMore Power?by sberry
In order to solve the spring issue I needed to install larger diameter doublewound springs. This involves machining the spring seats to accept these springs which means pulling the head. My friend Dick Pahle has named the ensuing dilemma the 'Knee-bone connected to the Thigh-Bone Conundrum' where I set out to fix 1 thing and end up doing 10 others 'while I have it apart...'. Yet again more Headwork
John recommended oversized exhaust valves(36mm from 35mm) so I decided to go with them. He also cleaned up some previous port work a bit and replaced some poorly installed valve guides around the exhaust valves. The tolerances were off enough to cause oil seepage into the combustion chamber - introducing some undesirable 'oil injection' into combustion. We left the Compression ratio at 9.6:1 static. While I had the head off I examined the OEM lifters I had installed during the rebuild (6000 miles ago). I saw heavy pitting on the lobe face of the lifter - hmmm. After checking around I found that this was not an isolated event and others had experienced the same with OEM lifters. I contacted Iskendarian and ordered a set of compatible Chevrolet lifters and reinstalled those rather than the damaged stock parts. I buttoned the engine back together with a new headgasket and took it out for a shakedown cruise. Bingo - the car pulled steady all the way to 6500rpm and felt noticeably smoother and stronger. It was definitely better than before. FandangoI installed an electric fan in place of the fixed stock fan. Mine is configured with a Spahl fan in front of the radiator connected to a switch kit I bought from Autozone for $15. It has a small adjustable thermostat switch you afix to the radiator and works like a charm - kicking on at about 200F. This was one of the best improvements I've made to the car - not for high-performance cooling reasons but purely from improvements in underhood noise. With the fan off you can hear a lot more of what is going on under the hood and fault diagnosis is significantly easier.
The Spahl fan was sort of expensive - north of $200 for fan and relay kit if I remember correctly. I bought it from a friend who had purchased it for an abandoned project. Flex-a-lite fans can be had for substantially less and work just as well. Installation was straightforward and I just dropped it in front of the radiator and suspended it with high-strength zip ties. Wiring uses a fused connection to the battery and this particular installation would not work well with an air conditioned car (my AC stuff is for sale BTW...). The optimum solution would be a fan the fits between the radiator and the nose of the waterpump like the setup used by Tom Clemmer of Raleigh, NC. Megasquirt has a code variant that allows me to drive the electric fan relay based on known coolant temp but I have yet to try it out. It involves building a piggyback board and the current setup ain't broke so I have not used it yet. IntermissionAt this point I was forced to really decommission the car for paint work and a brutal battery of rust repair. See a follow-up article about why I hate rust and my 9 month paintjob odyssey coming soon. Yet again another exhaust systemI was still unhappy with the tone and resonance of the exhaust system. After all of the fiddling and wasted money I was frustrated with the system. It sounded like crap and made driving the car annoying. The first mistake I had made was buying mufflers that were geared towards the aesthetically crippled sport-compact market. It sounded eXtremely awful. The second mistake I had made was having a hack muffler shop build the exhaust for me.
I used John Parker again as a vendor and purchased his stainless steel 2.5" over-the-axle exhaust system. The system is dynamite and slips together with ease. The mandrel bends and unpolished stainless were glaringly better than the previous 'custom' aluminized system. I installed it behind the 2.25" resonator aft of the header collector. For a muffler I went with a Borla. Every Borla system I had heard sounded with the perfect throaty burble. I had never heard their mufflers on a 4 cylinder motor but I took a risk and bought a $95 stainless Borla universal muffler (2.50" in, 2.50" out) and clamped it on the back with a 10" length of unpolished stainless as a tip extending aft of the rear muffler.
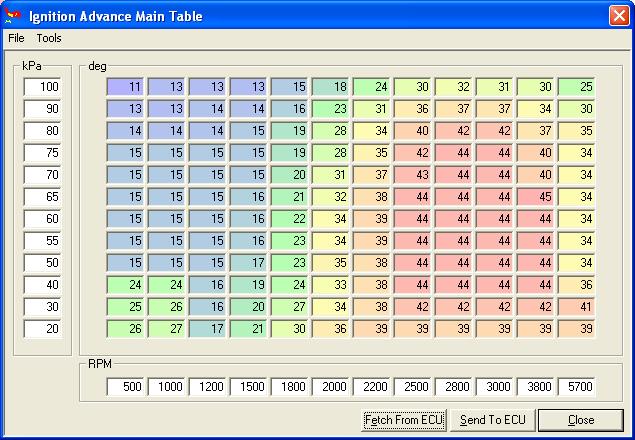
The resulting system sounds effing great. I'm finally happy with the exhaust on this car. It looks very solid as well. I would consider myself on the 'wuss' end of the spectrum in terms of tolerating resonance or 'blatty' exhaust volume and this system is well within my comfort zone. It is also far less conspicuous than my old system when I wind it up. MSNS-ExtraDuring this time I upgraded the software in my fuel injection controller to "MSNS-extra". This is simply an extension of the original code that allows greater resolution when programming fuel and spark. Instead of 8x8 tables for fuel and spark the tables are 12x12. In other words you have 144 bins to set fuel and spark instead of 64.
Below is my spark map. The high advance values are used at light cruise and wide open throttle (100kpa - straight across the top of the table) increases quickly to 30 BTDC which it holds until near 6000rpm where I begin dropping a bit advance. These full acceleration values were tuned on the dyno and I am seeing no detonation on 93 octane fuel. Pulling this advance at the end was good for a few horsepower and would not be possible with a normal distributor system. Turbotune Inc.Mark Riley dropped me an email and offered another set of runs on his dynojet dyno. Mark is not the closest dyno to use but I trust his tuning knowledge and he shows a genuine interest in my misguided quest for performance out of a tractor motor. So I filled up the thermos with coffee and scooted up to Greensboro, NC for some more pulls on the dyno. I had spent quite a while doing iterative tuning on the fuel and spark maps driving aroundtown with the laptop and I had most of my driveability issues worked out to a tee. Mark and I concentrated solely on wide open throttle searching for peak power. My previous dyno work was done on the same machine in similar baro/temp conditions so this would be as close to an apples and apples comparison as you can get on a chassis dyno. In the chart below the blue line represents my best pull last year before the modifications. The red line represents my best pull this year after the modifications. Last year I made 102rwhp and 108 ftlb's of torque, this year I produced 110rwhp and 115 ftlb's of torque. 
I was expecting a more substantial improvement but I did gain a lot of usable power back on the top end by fixing the problems with the head. I would have expected peak wheel horsepower to have been closer to 120 considering the level and quality of modifications I've made. Fuel and spark are dead-to-nuts so I'm not sure what the weak link is. Compression is perfect, cam is not worn, so on and so forth - everything is clinically tuned - not sure why I'm off the mark. The car is a blast to drive and pulls steadily without an 'on cam' torque peak. A stock motor makes 85-90rwhp so I'm definitely in good shape. I tip my hat to Phil Singher for his 163hp NA B20 - that's a real work of art on pump gas. Phil housed my wife and me for a night over the summer while we were wandering around the west coast. He took me for a ride in the MPPE and I was suitably bedazzled by the beast. I recommend the hell out of both John Parker and Phil S. for B20 motor stuff. At this point I still need to make the car faster. Glutton for punishment: What's Next?My goal is to produce a power-to-weight ratio that beats my former 2000 GTI VR6. This car was terrific (maybe my favorite ever) and would still be sitting in my driveway if VW had not lost control of quality issues. The VR6 GTI has 176 hp and weighs about 3300lbs. My 1800 weighs about 2500lbs so the target HP would be 130+ at the wheels. To go a step further: My high end target would be to match the power/weight of a Honda S2000 (assuming 210hp / 3000lbs) I would need to produce 175hp. I'm ready to work with Boost. I'm currently working (again) with John Parker to adapt his supercharger for use with programmable fuel injection. I'll be satisfied with with 130rwhp, I'll be ecstatic if I reach 175rwhp. Stay tuned. 01/2006 |